





Why Methuen Homeowners Are Upgrading Their Bathroom Vanities in 2026
Bathroom vanity installation in Methuen is one of the most impactful upgrades you can make to your home — and one of the most common reasons homeowners call a professional remodeling contractor.
Here’s a quick overview of what professional vanity installation in Methuen typically involves:
- Remove the old vanity — shut off water supply, disconnect plumbing, and demo the existing cabinet
- Prep the space — check walls, floors, and rough-in plumbing for damage or adjustments
- Set and level the new cabinet — anchor securely into wall studs using shims as needed
- Install the countertop and sink — fit, seal, and connect the drain assembly
- Reconnect plumbing — hook up supply lines, P-trap, and faucet
- Final caulk and leak test — seal the perimeter and verify all connections before cleanup
A straightforward same-location vanity swap typically takes 3 to 5 hours for an experienced installer. More complex projects — like wall-mounted vanities, double sinks, or bathrooms in older Methuen homes with aging plumbing — can run a full day or longer.
Costs vary widely. Based on average internet data (not a quote from Tranni Home Remodeling), a simple vanity swap runs roughly $400 to $1,500, a typical installed project lands between $900 and $4,500, and high-complexity installations can reach $3,000 to $9,000 or more depending on plumbing changes, countertop selection, and finish level.
Getting the job done right the first time matters — a poorly installed vanity can lead to water damage, uneven cabinets, or leaking connections that are costly to fix later. That’s why most Methuen homeowners choose to work with an experienced local contractor rather than attempt it themselves.
I’m Tyler Tranni, owner of Tranni Home Remodeling in Billerica, MA, with years of hands-on experience handling bathroom vanity installation for Methuen homeowners and the surrounding area. In this guide, I’ll walk you through everything you need to know — from choosing the right vanity to understanding costs, permits, and what to expect on installation day.
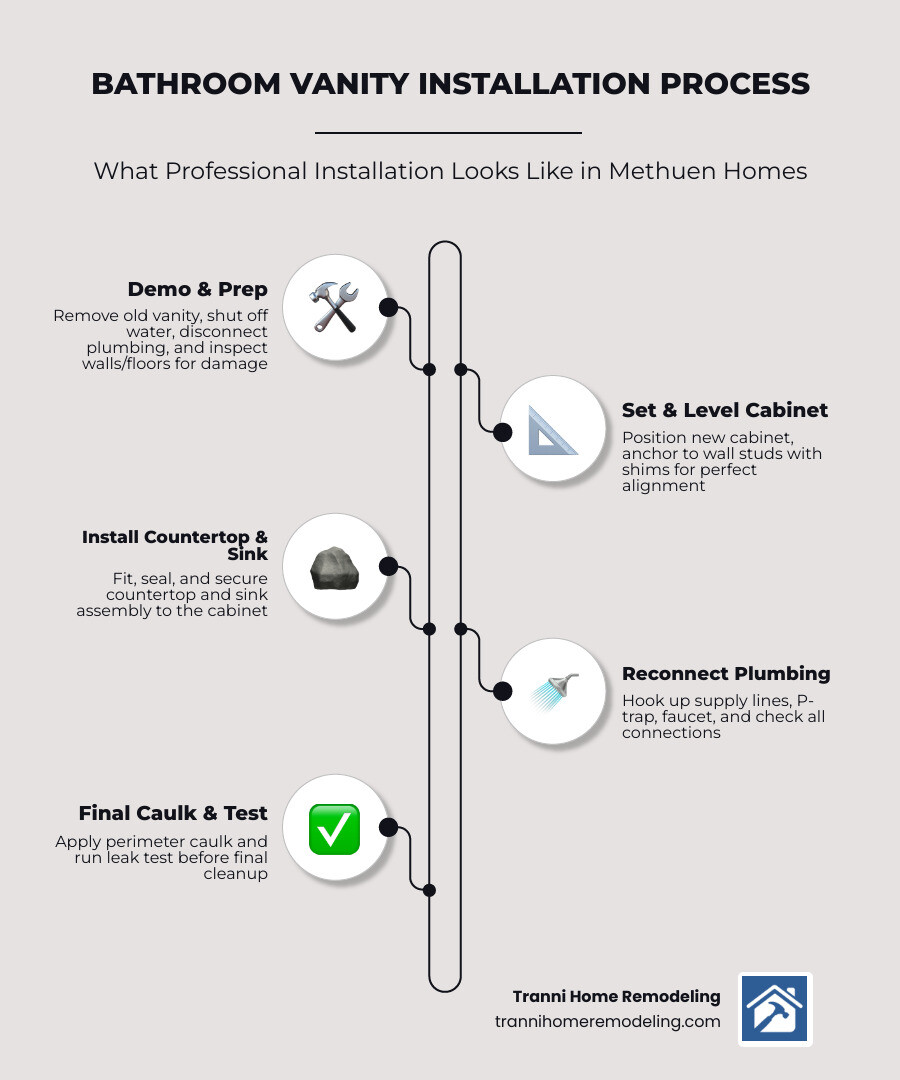
Bathroom vanity installation Methuen: What the professional process looks like
When homeowners search for Bathroom vanity installation Methuen, they usually want one thing: a smooth project with no surprise leaks, crooked drawers, or “why is the sink draining uphill?” moments.
Our professional process is built around planning first, then precise installation. In most Methuen homes, that means:
- shutting off the water and protecting the work area
- removing the old vanity carefully
- checking the wall, floor, and plumbing rough-in
- setting the new cabinet level and secure
- installing the countertop, sink, and faucet
- reconnecting plumbing
- sealing, testing, and cleaning up
A vanity install may look simple from the doorway, but a lot happens in a tight footprint. Bathrooms combine plumbing, finish carpentry, wall repair, and moisture protection in one small space. That is why details matter.

For broader project planning, you can also explore our bathroom remodeling contractor services.
Bathroom vanity installation Methuen step by step
Here is how a professional install usually goes:
-
Protect the room and shut off water We lay down floor protection, clear the vanity zone, and shut off the sink supply valves. If the valves are old or unreliable, we note that right away because aging shutoffs are common trouble spots in older homes.
-
Disconnect supply lines and drain The faucet connections, P-trap, and drain assembly come apart before the old unit is removed. In some bathrooms, corrosion or outdated plumbing parts make this step slower than expected.
-
Remove the old vanity We detach the top, loosen wall fasteners, and remove the cabinet. Once it is out, we can finally see what is hiding behind it. Sometimes it is fine. Sometimes it is old water staining, unfinished flooring, cracked plaster, or a rough-in that is not centered.
-
Inspect rough-in plumbing and surfaces We check drain location, supply line height, wall condition, and floor level. Standard rough-in measurements often fall around:
- supply lines about 20 to 22 inches above the floor
- drain stub-out about 18 to 20 inches above the floor
- supply line spacing about 8 inches on center
Not every older bathroom follows modern conventions, so field verification matters.
-
Set the cabinet and level it We dry-fit the vanity, shim where needed, and make sure it sits level front-to-back and side-to-side. An out-of-level vanity can cause drawer misalignment, uneven countertop seams, and doors that swing open on their own. Charming in a haunted house, less charming in a bathroom.
-
Anchor into studs Vanities should be secured properly, usually into wall studs. Floating vanities may require structural blocking, not just drywall anchors.
-
Install countertop, sink, and faucet Depending on the vanity type, the top may be integrated, separate stone, quartz, granite, or solid surface. We seal where needed and fit the sink and faucet carefully.
-
Reconnect plumbing We install or reconnect supply lines, the drain assembly, and the P-trap. New braided supply lines are usually the smart choice rather than reusing old ones.
-
Caulk and leak test We finish with mold-resistant silicone in the right places, then run water and inspect every connection before cleanup.
If you want a DIY reference for general process comparison, these guides can be helpful: Easy Freestanding Vanity Wall Installation and How to install a bathroom vanity step by step.
How local contractors coordinate design, delivery, and installation
A successful vanity install starts before installation day.
In Methuen-area projects, coordination usually includes:
- final site measurements before ordering
- confirming vanity width, depth, and plumbing access openings
- checking if the top, sink, and faucet are all compatible
- scheduling delivery so materials do not sit in a garage for weeks
- inspecting for shipping damage before install day
- coordinating countertop templating if needed
- sequencing plumbing and carpentry work in the right order
- creating a punch list for final adjustments
This is especially important when the project is part of a larger bathroom remodeling job. One trade affects the next. If the vanity shows up damaged, the countertop is late, or the drain is off-center, the schedule can shift quickly.
How long bathroom vanity installation takes in Methuen homes
Most homeowners want the honest version, not the “should be quick” version.
Typical timelines look like this:
| Project type | Typical time |
|---|---|
| Same-location freestanding vanity swap | 3 to 5 hours |
| First-time install with minor adjustments | 1 full day |
| Wall-mounted vanity | 4 to 8 hours or more |
| Double vanity with plumbing modifications | 1 to 2 days |
| Vanity install as part of larger remodel | Several days to 1+ week depending on scope |
Bathroom remodeling projects overall can range from a couple of days to several weeks depending on scope, trade coordination, and permits. A vanity-only job is much faster, but hidden conditions can still affect timing.
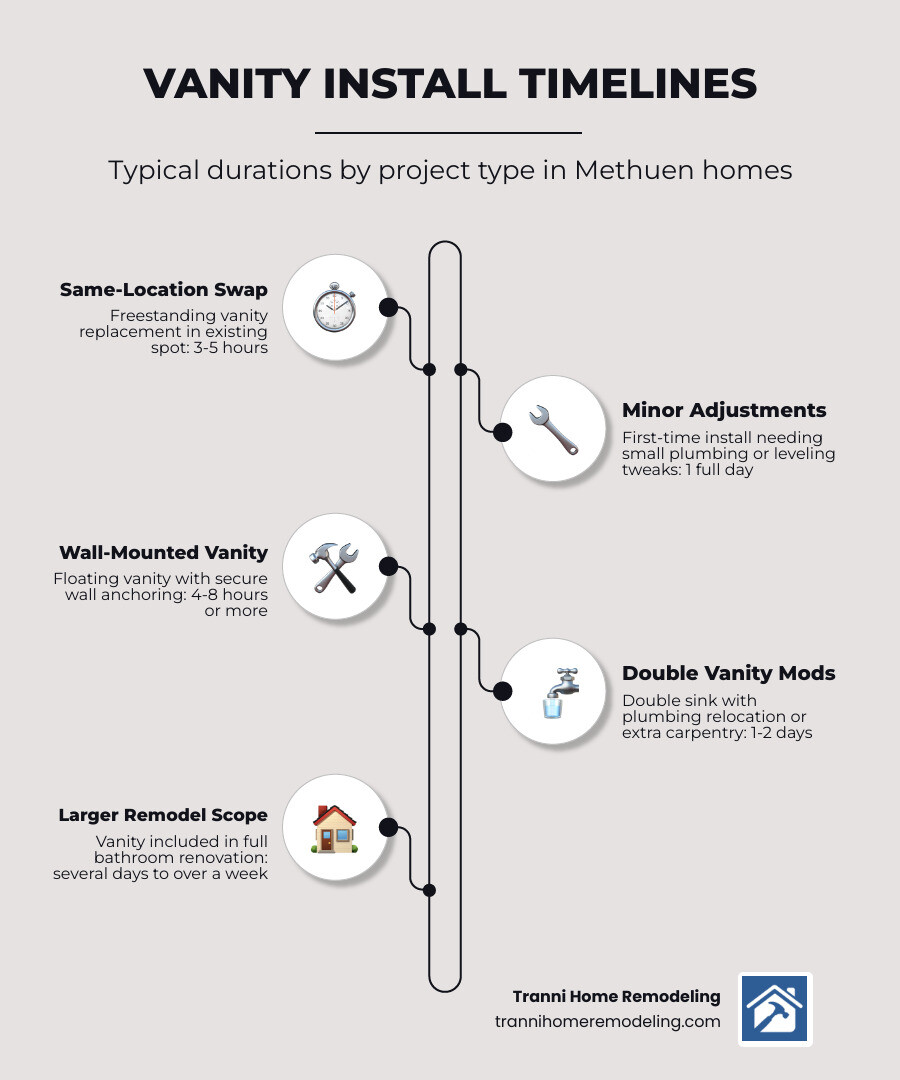
Typical timeframes for freestanding vs wall-mounted vanities
Freestanding vanities
- usually the fastest option
- often installed in one visit
- ideal for same-location replacements
- common install time: 3 to 5 hours for a straightforward swap
Wall-mounted or floating vanities
- usually take longer
- may need blocking inside the wall
- often require more exact rough-in alignment
- common install time: 4 to 8 hours, sometimes more
Single-sink vanities
- faster than double vanities in most cases
- simpler plumbing and countertop layout
Double-sink vanities
- more involved due to two drains, two faucets, or more complex tops
- may push the project into a full-day or multi-day schedule
What can slow down a vanity installation in older Methuen bathrooms
Methuen has many homes with age and character. We like character. Plumbing, however, sometimes takes that as permission to get creative.
Common delays include:
- old shutoff valves that do not fully close
- copper lines that need updating
- drain height that does not match the new vanity
- uneven floors under the old cabinet
- plaster or tile wall repairs after removal
- water damage behind the old vanity
- vent stack or pipe placement interfering with drawers
- outlet or baseboard conflicts
- unfinished flooring where the old vanity sat
These issues are exactly why professional planning matters. A vanity that looks perfect online can become a headache if the drawer box collides with the drain line in a 1950s bathroom.
Choosing the right vanity for a Methuen bathroom
The best vanity is not just the prettiest one. It needs to fit the room, match the plumbing, provide enough storage, and hold up to daily humidity and splash zones.
Popular options for Methuen homeowners include:
- single-sink vanities for guest baths and smaller full baths
- double vanities for primary bathrooms
- freestanding vanities for easier replacement and traditional appeal
- wall-mounted vanities for a cleaner, more open look
- comfort-height vanities around 34 to 36 inches tall
- shaker and transitional styles that work with many New England homes
- modern farmhouse and traditional styles depending on the home

If you are planning a broader upgrade, see our bathroom remodeling services.
Popular vanity sizes and styles for Methuen homeowners
Common vanity widths include:
- 24 inch: powder rooms and very tight bathrooms
- 30 inch: compact full baths
- 36 inch: one of the most popular sizes for single-sink bathrooms
- 48 inch: generous single-sink or compact double-sink setup
- 60 inch: very popular for double-sink primary baths
- 72 inch: larger primary bathrooms with more wall space
Style-wise, we see the most interest in:
- shaker cabinets
- clean transitional looks
- painted wood finishes in white, gray, navy, or warm neutral tones
- drawer-heavy storage over door-heavy storage
- integrated organizers and linen storage where space allows
For many homeowners, freestanding vanities remain popular because they combine good storage with flexible installation. Floating vanities are also gaining traction because they visually open up the floor and make cleaning easier.
Bathroom vanity installation Methuen sizing rules and layout tips
A vanity should fit the room without turning the bathroom into an obstacle course.
Useful layout guidelines include:
- at least 21 inches of clear floor space in front of the vanity
- around 15 inches from the vanity centerline or edge to nearby obstructions where possible
- vanity depth typically around 18 to 22 inches
- enough clearance for cabinet doors and drawers to open fully
- enough room for the bathroom door to swing comfortably
- mirror width scaled properly to the vanity, not wildly oversized or undersized
Also consider:
- who uses the bathroom every day
- how much counter space you really need
- whether open floor area matters more than storage
- whether the plumbing location supports the vanity style you want
Comfort-height vanities, usually 34 to 36 inches tall, are especially popular because they feel more natural for adults. Traditional heights around 30 to 32 inches still make sense in some family or child-focused bathrooms.
Best countertop materials for New England bathroom conditions
Countertop choice matters just as much as cabinet choice.
Quartz
- non-porous
- low maintenance
- resists staining and bacteria well
- one of the best all-around choices for bathrooms
Granite
- durable and attractive
- offers natural variation
- needs periodic sealing
Marble
- beautiful but higher maintenance
- more prone to etching and staining
- better for homeowners who do not mind upkeep
Solid surface
- seamless appearance
- easy cleaning
- can integrate nicely with sinks
- practical and budget-friendly in many applications
For New England conditions, quartz is often the easiest recommendation because it handles humidity well and does not require sealing. Granite can also perform well if maintained properly.
For a technical step-by-step installation reference, this guide is helpful: How to install a bathroom vanity step by step.
Cost, permits, and plumbing considerations for vanity installation in Methuen
This is where planning saves money.
A vanity install cost is shaped by more than the cabinet itself. The final number depends on:
- vanity size and quality
- countertop material
- faucet and sink selection
- whether plumbing stays in the same location
- whether shutoff valves or drains need replacement
- wall or floor repairs
- whether the project is part of a full remodel
You can learn more about project planning through our bathroom remodelers near me page.
Average vanity installation cost in Methuen, MA
Based on average internet data only, not pricing from Tranni Home Remodeling, homeowners often see ranges like these:
- Simple vanity swap: $400 to $1,500
- Typical installed vanity project: $900 to $4,500
- Higher-complexity vanity installation: $3,000 to $9,000+
A rough breakdown might look like this:
- budget vanity and basic labor: lower end
- mid-range vanity with new faucet and top: middle range
- custom vanity, stone top, plumbing changes, wall repair: upper range
Labor-only installation can vary widely too, especially if plumbing surprises appear once the old vanity comes out.
If your vanity install is part of a full bathroom remodel, total project costs climb well beyond vanity pricing alone. Some bathroom remodel packages in the market commonly fall in the $25,000 to $40,000 range, which shows how fast costs rise once tile, shower work, electrical, and finish upgrades are included.
Do Methuen homeowners need permits for bathroom vanity installation?
For a simple like-for-like vanity replacement in the same location, permits are often not needed.
Permits may be required when the project includes:
- moving drain lines
- moving water supply lines
- adding or relocating electrical outlets or vanity lighting
- opening walls for structural blocking
- broader remodeling work that triggers inspection requirements
Because permit rules can depend on the exact scope, the safest move is to confirm local requirements before work begins. In general, once plumbing, electrical, or structural work changes, permit review becomes much more likely.
Key plumbing details professionals check before installation
Before we install a new vanity, we pay close attention to the plumbing details that cause the most problems later:
- drain center location
- drain height
- supply valve condition
- water pressure
- trap alignment
- signs of corrosion
- whether venting appears adequate
- whether supply lines should be replaced
- whether the new drawer layout will interfere with pipes
We also look at leak prevention basics:
- properly fitted drain assembly
- secure P-trap connections
- new braided stainless supply lines where appropriate
- correct sealant and caulk application
- full water test before completion
Why hiring a professional vanity installer beats DIY
There is nothing wrong with DIY confidence. But vanity installation sits in that tricky zone where one small miss can create a much bigger repair later.
Why many homeowners hire us instead of doing it themselves:
- more accurate measurements
- cleaner finish quality
- better leak prevention
- code-aware plumbing and electrical coordination
- faster completion
- easier supplier and delivery coordination
- fewer surprises with older homes
- better accountability if something needs adjustment
A DIY tutorial can be useful for understanding the process, but most homeowners in Methuen are not looking for a weekend science experiment involving silicone, shutoff valves, and a cabinet that costs real money.
For more on planning a bathroom project the smart way, visit our bathroom remodeling services near me guide.
How to prepare your bathroom before installation day
Homeowners can make installation day easier with a little prep:
- empty the old vanity completely
- remove toiletries, rugs, and decor
- clear a path from the entry door to the bathroom
- protect pets and keep kids out of the work zone
- confirm the new vanity has been checked for damage
- make sure parking and access are available
- know where the main water shutoff is
- confirm final measurements before materials are ordered
- remove fragile wall art or accessories nearby
A little prep helps the day move faster and keeps the install area safer and cleaner.
What warranties and guarantees to ask for
Before hiring any installer, ask clear questions about:
- labor warranty
- manufacturer warranty on the vanity
- countertop warranty
- faucet or fixture warranty
- what happens if a leak appears shortly after install
- whether punch-list items are covered
- whether the scope of work is in writing
- how change orders are handled if hidden issues are found
A good contract should explain what is included, what is excluded, and how unexpected conditions are priced and approved.
Frequently Asked Questions About Bathroom Vanity Installation Methuen
How much does bathroom vanity installation typically cost in Methuen, MA?
Based on average internet data, a simple swap often runs about $400 to $1,500, a more typical installed vanity project falls around $900 to $4,500, and a complex project involving plumbing changes, custom materials, or repairs can reach $3,000 to $9,000+. Final cost depends heavily on labor complexity, vanity quality, countertop material, and whether plumbing stays in place.
How long does a typical bathroom vanity installation take in Methuen homes?
A straightforward same-location replacement often takes 3 to 5 hours. More involved jobs may take a full day. Wall-mounted vanities, double-sink layouts, or bathrooms with hidden damage can stretch into a multi-day project, especially if wall repair, plumbing modification, or permit-related work is needed.
What should homeowners in Methuen consider before choosing a vanity?
Focus on:
- the actual available width and depth
- front clearance and traffic flow
- whether the bathroom needs one sink or two
- storage needs
- plumbing location
- countertop durability
- style fit with the rest of the bathroom
- whether comfort height makes sense for daily users
In many cases, the right vanity is the one that fits the room and plumbing well, not just the one with the nicest showroom lighting.
Conclusion
A well-planned vanity upgrade can transform a bathroom’s storage, function, and overall look without requiring a full gut remodel. For Methuen homeowners, the key is choosing the right size, style, and material – and making sure the installation is handled carefully from shutoff valves to final caulk line.
At Tranni Home Remodeling, we bring over a decade of hands-on remodeling experience to bathroom projects throughout Methuen and nearby communities. We focus on quality craftsmanship, straightforward communication, and finish work that looks right and performs the way it should.
If you are considering Bathroom vanity installation Methuen homeowners can rely on, we are here to help you plan the project the smart way.
Learn more about our bathroom remodeling services.
