100 amp breaker box wiring: 10 Powerful Tips for Success 2025
Understanding 100 Amp Breaker Box Wiring Basics
100 amp breaker box wiring requires careful planning and proper installation to ensure safe, code-compliant electrical service for your home. Here’s what you need to know:
Essential Requirements:
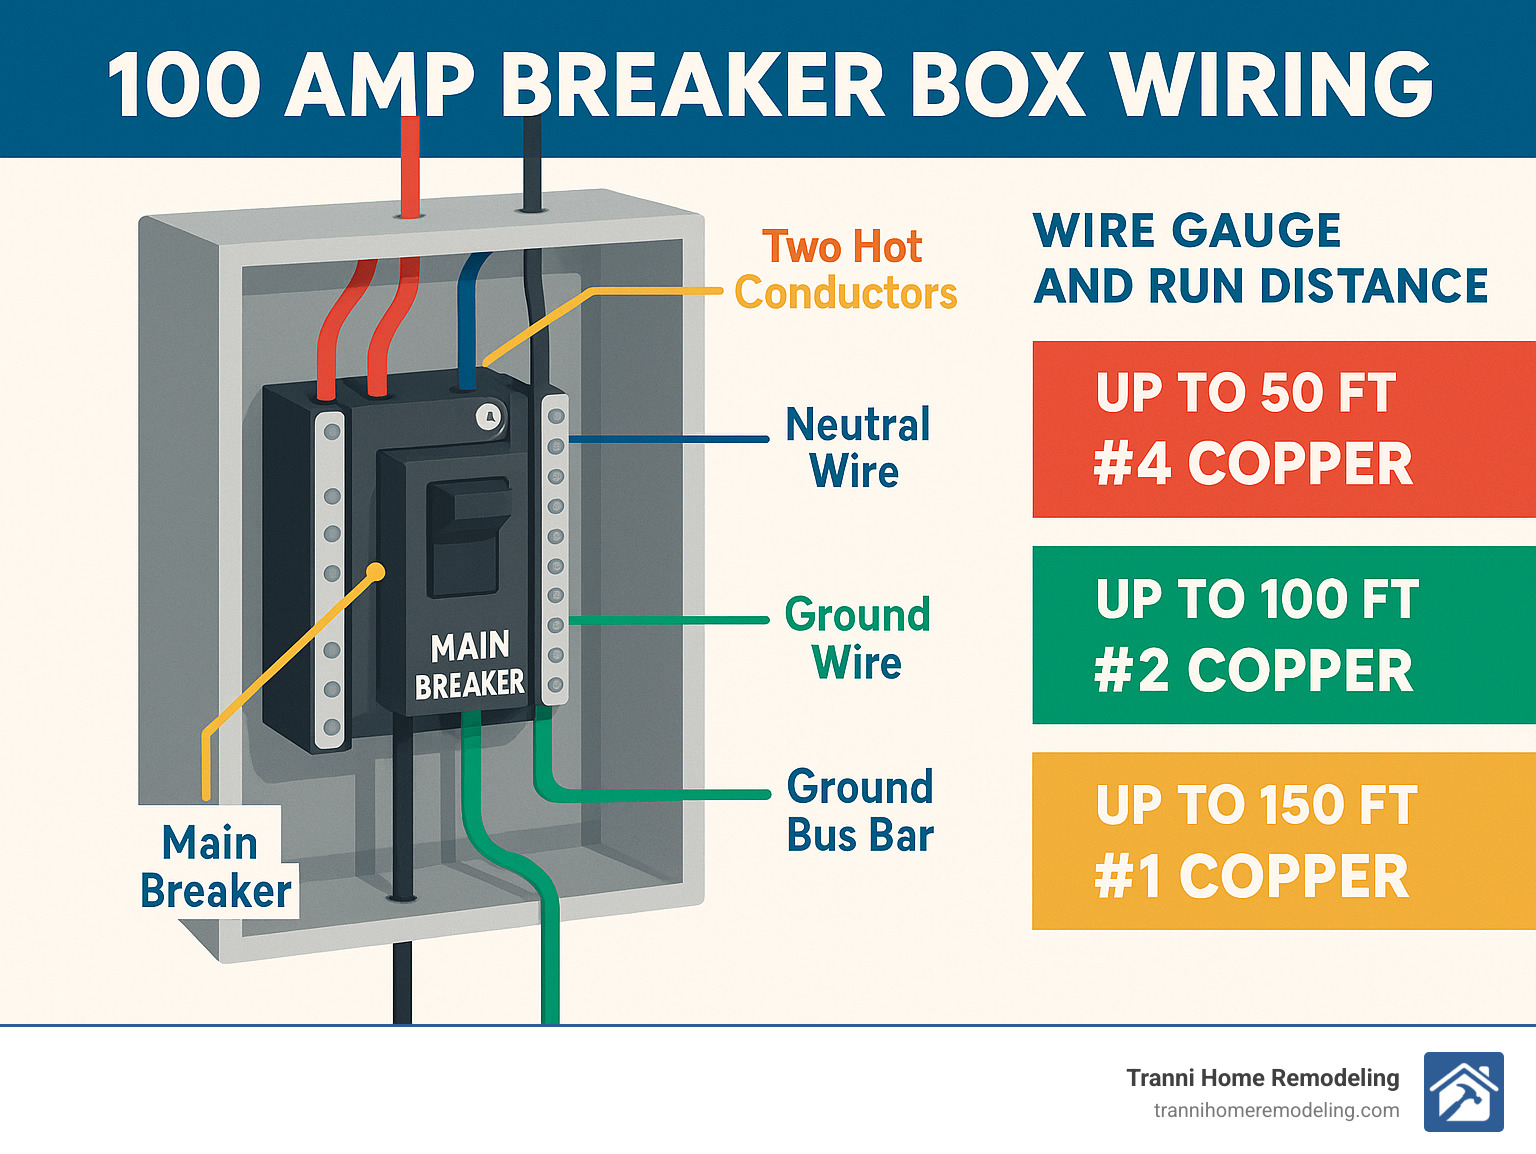
– Wire size: #4 AWG copper or #2 AWG aluminum for most installations
– Four-wire feed: Two hots, one neutral, one ground conductor
– Proper grounding: Ground rods required for detached structures
– Voltage drop: Keep under 3% for branch circuits, 5% for feeders
– Applications: Mid-sized homes, detached garages, workshops, subpanels
A 100 amp service panel serves as the electrical hub for mid-sized homes and is commonly used for detached garages or workshops. Most installations require #2 AWG wire, though #4 AWG copper can work for runs under 50 feet.
Safety comes first with any electrical project. While some homeowners tackle basic wiring, 100 amp installations involve high-voltage connections that can cause serious injury or fire if done incorrectly. The National Electrical Code requires specific wire sizes, grounding methods, and installation procedures that must be followed exactly.
The complexity increases when wiring subpanels in detached structures. You’ll need to separate neutral and ground conductors, install proper grounding electrodes, and ensure adequate wire sizing for the distance involved.
As Tyler Tranni, owner of Tranni Home Remodeling in Billerica, MA, I’ve overseen countless electrical upgrades including 100 amp breaker box wiring projects during kitchen remodels, basement finishing, and garage conversions. My experience has shown that proper planning and code compliance are essential for safe, reliable electrical systems that serve homeowners for decades.
100 amp breaker box wiring definitions:
– change breaker panel
– home wiring replacement
– upgrading electrical in old home
Planning Your 100 Amp Breaker Box Wiring Project

Good planning prevents headaches, callbacks, and expensive re-work. After more than a decade upgrading panels in homes from Andover to Woburn, we have distilled the process down to five key steps:
- Calculate your load. A 100 A panel generally covers a detached garage or homes under ±2,500 sq ft. If you expect electric heat or an EV charger soon, price out 200 A instead so you only open walls once.
- Pick an accessible location. You need 36 in of clear working space and a spot that is NOT behind stored items or within 3 ft of gas meters. Eye-level mounting makes breaker labels easy to read.
- Secure the permit early. Every town in Middlesex County requires a permit and inspection for service changes. Inspections protect you, lower insurance risk, and uncover mistakes before drywall goes up.
- Plan the cable route. Measure the feeder length and note temperature extremes. #4 Cu handles 100 A for runs ≤50 ft; #2 Al is fine to about 100 ft; beyond that voltage-drop math dictates larger conductors.
- Schedule around weather. Underground trenching is far cheaper in spring–fall than in frozen January soil.
Determining Wire Size
• #4 AWG copper – up to 50 ft
• #2 AWG aluminum – up to ~100 ft
• Upsize one trade size for every additional 50–75 ft to keep feeder voltage-drop <5 %.
Choosing Wire Type
• THHN/THWN inside conduit
• XHHW-2 or URD for direct burial
• SER for above-ground exterior feeds
Copper is easier to terminate; aluminum is lighter on the wallet. When we do long garage feeds in Carlisle or Lexington, the savings on aluminum often pays for the trench.
Will 100 A Be Enough?
Create a quick inventory:
Appliance | Typical Amps
—|Electric range | 40–50
Dryer | 30
Air-con (3-ton) | 20–25
Water heater | 20–25
EV charger L2 | 30–50 (future)
Apply NEC demand factors and diversity, then add 20 % headroom for future tools or an EV. If numbers still sit below 80 A, 100 A service is a safe call. Otherwise, explore a 200 A upgrade while walls are open.
Step-by-Step 100 Amp Breaker Box Wiring Procedure

Below is the condensed field checklist we follow on every sub-panel job. Do NOT work hot—always shut power off at the main and confirm with a non-contact tester.
- Mount the panel level and at 4–6 ft from the floor.
- Pull the feeder (4 conductors) through conduit or direct-bury cable, observing burial depth (24 in typical) and support intervals.
- Lug terminations – Strip to manufacturer spec and torque with a calibrated wrench. Aluminum gets a thin coat of antioxidant.
- Isolate neutral – Remove the bonding screw or strap so the neutral bar floats. Add a separate ground bar bonded to the can.
- Land branch circuits neatly, maintaining bend radius and labeling as you go.
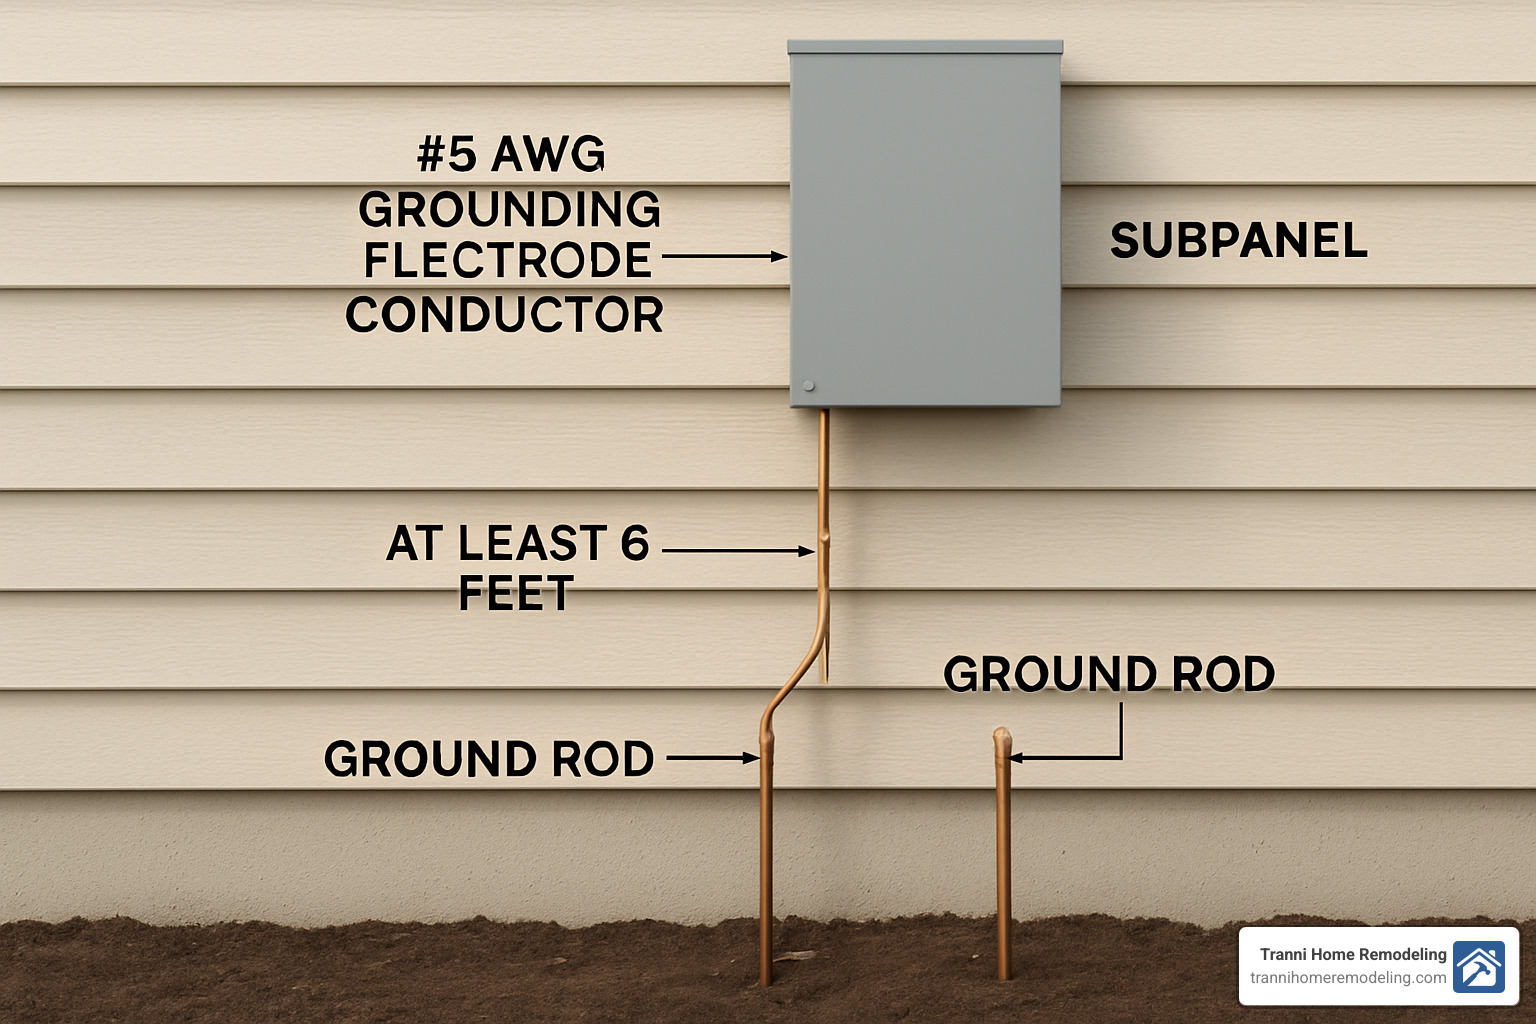
- Grounding electrode – Run uninterrupted #6 Cu to two 8-ft rods spaced ≥6 ft apart.
- Test & energize – Continuity, torque re-check, then power up main → sub-main → individual breakers one at a time.
| Conductor | Ampacity 75 °C | Max 100 A Distance* | Weight/100 ft | Relative Cost |
|---|---|---|---|---|
| #4 Cu | 85 A | 50 ft | 31 lb | $$ |
| #2 Cu | 115 A | 150 ft+ | 49 lb | $$$ |
| #2 Al | 90 A | 100 ft | 18 lb | $ |
*Assumes ≤5 % feeder voltage-drop.
Detached-Garage Notes
• Trench 24-30 in, avoid existing utilities (call Dig Safe).
• Use schedule-40 PVC sweeps for easy pulling.
• Two ground rods almost always cheaper than resistance testing one rod.
• Bond any metal water or gas piping present in the garage.
NEC Code Compliance, Grounding & Safety Essentials
Following the National Electrical Code (NEC) keeps people and property safe—period. Articles 310.16 (conductor sizing) and 250 (grounding) are the two big ones for 100 A subpanels.
Key reminders we see missed during remodels in Stoneham, Reading, and Wilmington:
• Ampacity vs. temperature. That #2 Al in a 140 °F attic may need upsizing.
• Working clearance. 36 in front, 30 in wide, floor-to-ceiling. No holiday bins allowed.
• GFCI/AFCI – Garages and outdoor circuits require GFCI; most living-area receptacles need AFCI in newer code cycles.
• Torque labels matter; loose lugs cause more fires than bad wire sizes.
Grounding a 100 A Subpanel the Right Way
• Two 8-ft ground rods ≥6 ft apart.
• Continuous #6 Cu grounding-electrode conductor to the new panel’s ground bar.
• Bond all metal piping and structural steel.
Common Mistakes to Avoid
- Neutral-ground bond left in subpanel.
- Conductor undersized for distance (voltage-drop ignored).
- No permit/inspection—creates resale headaches.
- Ground rods omitted on detached buildings.
Troubleshooting, Upgrades & Cost Considerations
Typical symptoms and cures:
• Nuisance trips – Unplug loads; if the breaker trips empty, call a pro—likely a short or failed breaker.
• Warm lugs – Shut power, torque connections; replace damaged conductors.
• Dimming lights – Check feeder size and utility connections; excessive voltage-drop is common on long runs.
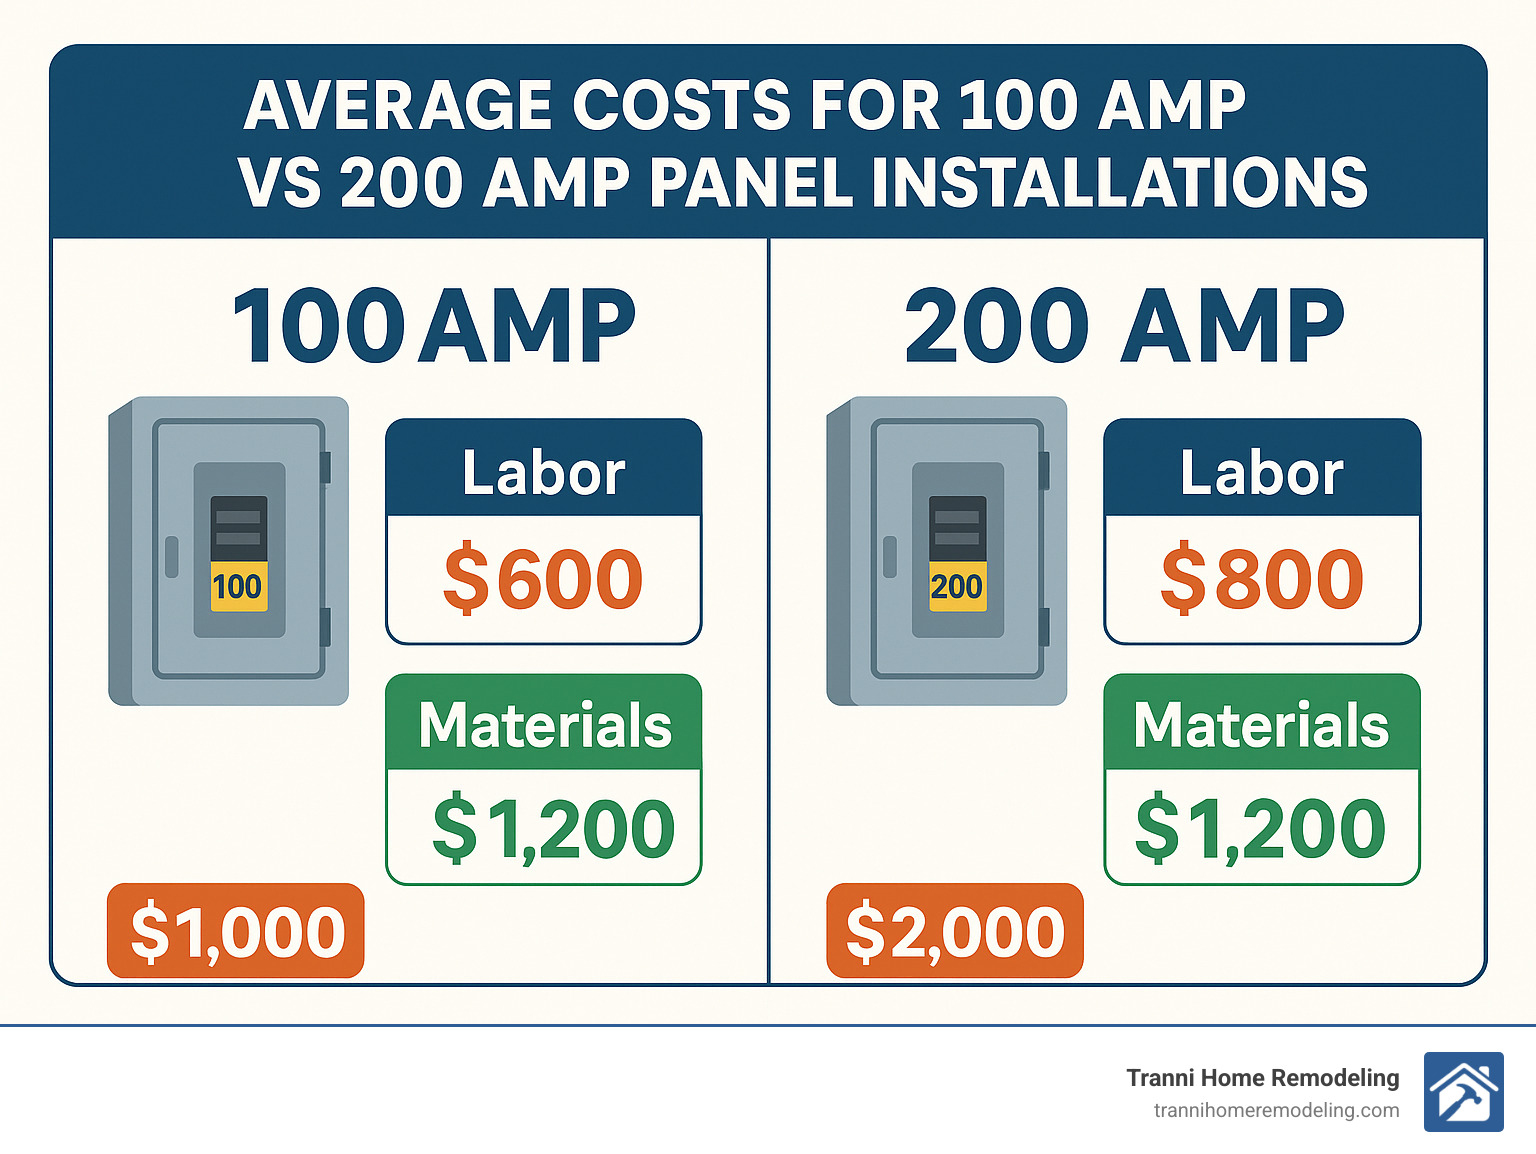
Ball-Park Pricing (Internet Averages)
Service Only | Low | High
—|—|100 A Subpanel (near main) | $1,200 | $4,000
Detached-Garage Feed 60-100 ft | $2,000 | $6,000
Complex 200 A Upgrade | $4,500 | $15,000+
Figures are broad averages pulled from national remodeling databases—not Tranni Home Remodeling quotes.
When to Jump to 200 A
Electric vehicle chargers (30–50 A), whole-house heat pumps (40–60 A), or large additions almost always tip the scales. Bundling the upgrade with a kitchen or basement remodel saves money and avoids opening walls twice.
Frequently Asked Questions about 100 Amp Breaker Box Wiring
What size wire do I need if the run is over 150 ft?
Distance matters tremendously when sizing conductors for 100 amp breaker box wiring. Standard #2 AWG copper simply won’t cut it for runs over 150 feet without creating dangerous voltage drop issues.
The physics behind this is straightforward – electricity loses voltage as it travels through wire, and longer distances mean more voltage loss. For a 150-foot run carrying 100 amps, you’ll likely need to bump up to #1 AWG copper or even 1/0 aluminum to keep voltage drop under the 5% NEC limit for feeders.
Here’s the reality we’ve encountered in our projects throughout Middlesex County: a 200-foot run to a detached garage using #2 copper can drop 15-20 volts, causing motors to overheat and LED lights to flicker. That’s why we always calculate voltage drop using the formula VD = (2 × K × I × L) / CM before ordering materials.
Don’t guess on long runs. The cost difference between #2 and #1 copper is significant, but it’s nothing compared to replacing burned-out equipment or dealing with a house fire from overheated connections.
Can I use aluminum wire inside the house?
Aluminum conductors work perfectly fine for 100 amp breaker box wiring when installed correctly. The key phrase here is “when installed correctly” – aluminum requires more attention to detail than copper.
Mobile home feeder cable (2-2-2-4 aluminum) is actually quite popular for subpanel installations. It’s lighter than copper, costs less, and handles the current just fine. The catch? Those 2 AWG aluminum conductors are only rated for 90 amps, not the full 100 amps you might expect.
The critical installation details include using anti-oxidant compound on every connection and ensuring all terminations are specifically rated for aluminum. Skip these steps and you’re asking for trouble – aluminum oxidizes differently than copper and can create high-resistance connections that overheat.
During our electrical upgrades in Reading and Wilmington, we’ve seen both excellent aluminum installations and scary ones. The difference always comes down to proper technique and using the right materials.
Do I need one or two ground rods at my garage?
Technically, the NEC only requires one ground rod if its resistance to earth measures less than 25 ohms. Practically speaking, two ground rods spaced at least 6 feet apart is the standard approach for 100 amp breaker box wiring in detached structures.
Here’s why most electricians automatically install two rods: testing ground resistance requires specialized equipment and adds time to the job. The resistance test costs more than simply installing a second rod, and two rods provide better lightning protection anyway.
We’ve installed countless garage subpanels in Chelmsford, Dracut, and surrounding towns, and two ground rods is our standard practice. The soil conditions in our area can be challenging – lots of rocky ground and clay that doesn’t conduct electricity well.
The spacing matters too. Those rods need to be at least 6 feet apart to be effective. Closer spacing doesn’t provide much additional benefit because the rods interfere with each other’s grounding ability. Drive them deep enough so at least 8 feet of rod contacts the earth, even if that means going below the frost line.
Conclusion
Getting 100 amp breaker box wiring right isn’t just about following a checklist—it’s about creating a safe, reliable electrical system that protects your family and powers your home for years to come. From calculating proper wire sizes and managing voltage drop to installing grounding electrodes and separating neutral-ground connections, every detail matters for both safety and code compliance.
Through our decade of home remodeling experience here in Billerica and throughout Middlesex County, we’ve seen how proper electrical work forms the backbone of successful renovations. Whether we’re finishing a basement in Chelmsford, remodeling a kitchen in Burlington, or adding a workshop to a garage in Wilmington, the electrical system has to be rock-solid from day one.
The complexity of 100 amp breaker box wiring often surprises homeowners. What starts as a seemingly straightforward project quickly involves load calculations, voltage drop formulas, grounding electrode systems, and permit requirements. Add in the safety risks of working with high-voltage connections, and it becomes clear why most municipalities require professional installation.
That’s where experience makes all the difference. Our team has steerd the unique challenges of older homes in Reading and Stoneham, dealt with rocky soil conditions in Concord and Carlisle, and helped countless families upgrade their electrical systems safely and efficiently.
Planning ahead pays off too. Many of our clients start with 100 amp service for a detached garage, then realize they want electric vehicle charging or workshop equipment that pushes the limits. Having those conversations early helps avoid costly upgrades down the road.
If you’re considering any electrical work as part of a larger renovation project, we’d love to help you explore your options. Explore our Home Remodeling services to see how we can integrate safe, code-compliant electrical systems into your next kitchen remodel, basement finishing project, or home addition—ensuring everything works perfectly together for decades of reliable service.
