





Why Historic Plaster Repair Is Worth Every Effort
Historic plaster repair is the process of stabilizing, patching, and restoring original lime or gypsum plaster walls and ceilings in older homes — preserving both their structural integrity and their historical character.
Here’s a quick overview of what it involves:
| Step | What It Means |
|---|---|
| Assess | Inspect for cracks, loose sections, delamination, and moisture damage |
| Stabilize | Secure failing plaster before it falls or worsens |
| Patch | Fill damaged areas using compatible lime or gypsum materials |
| Restore | Match original texture and finish for a seamless result |
| Maintain | Address moisture and structural issues to prevent future damage |
Walk into any home built before the 1940s and there’s a good chance the walls around you are telling a story. As the National Park Service’s Preservation Brief 21 puts it, plaster in a historic building is like a family album — the handwriting of the artisans, the taste of the original occupants, and the evolving styles of decoration are all embedded in the fabric of the building.
That’s not just poetic. It’s practical, too.
Original three-coat plaster is remarkably durable. It resists fire, deadens sound, and — thanks to its lime content — even fights off mold. And yet, when cracks appear or sections start to sag, many homeowners assume the only answer is to tear it all out and start over with drywall.
That assumption is almost always wrong.
With the right approach, most historic plaster can be repaired in place — saving you money, preserving your home’s character, and avoiding the messy, costly process of full removal.
I’m Tyler Tranni, owner of Tranni Home Remodeling in Billerica, MA, with years of hands-on experience in historic plaster repair and interior restoration across the region. In this guide, I’ll walk you through everything you need to know — from assessing damage to choosing the right materials and knowing when to call in a professional.
Historic plaster repair terms to know:
The Essentials of Historic Plaster Repair
When we talk about historic plaster repair in April 2026, we are usually dealing with a system that was the standard for nearly all buildings until the 1930s or 1940s. Unlike modern drywall, which consists of paper-faced gypsum boards screwed to studs, historic plaster is a “wet” system. It was applied by hand in multiple layers over a substrate, most commonly wood lath.
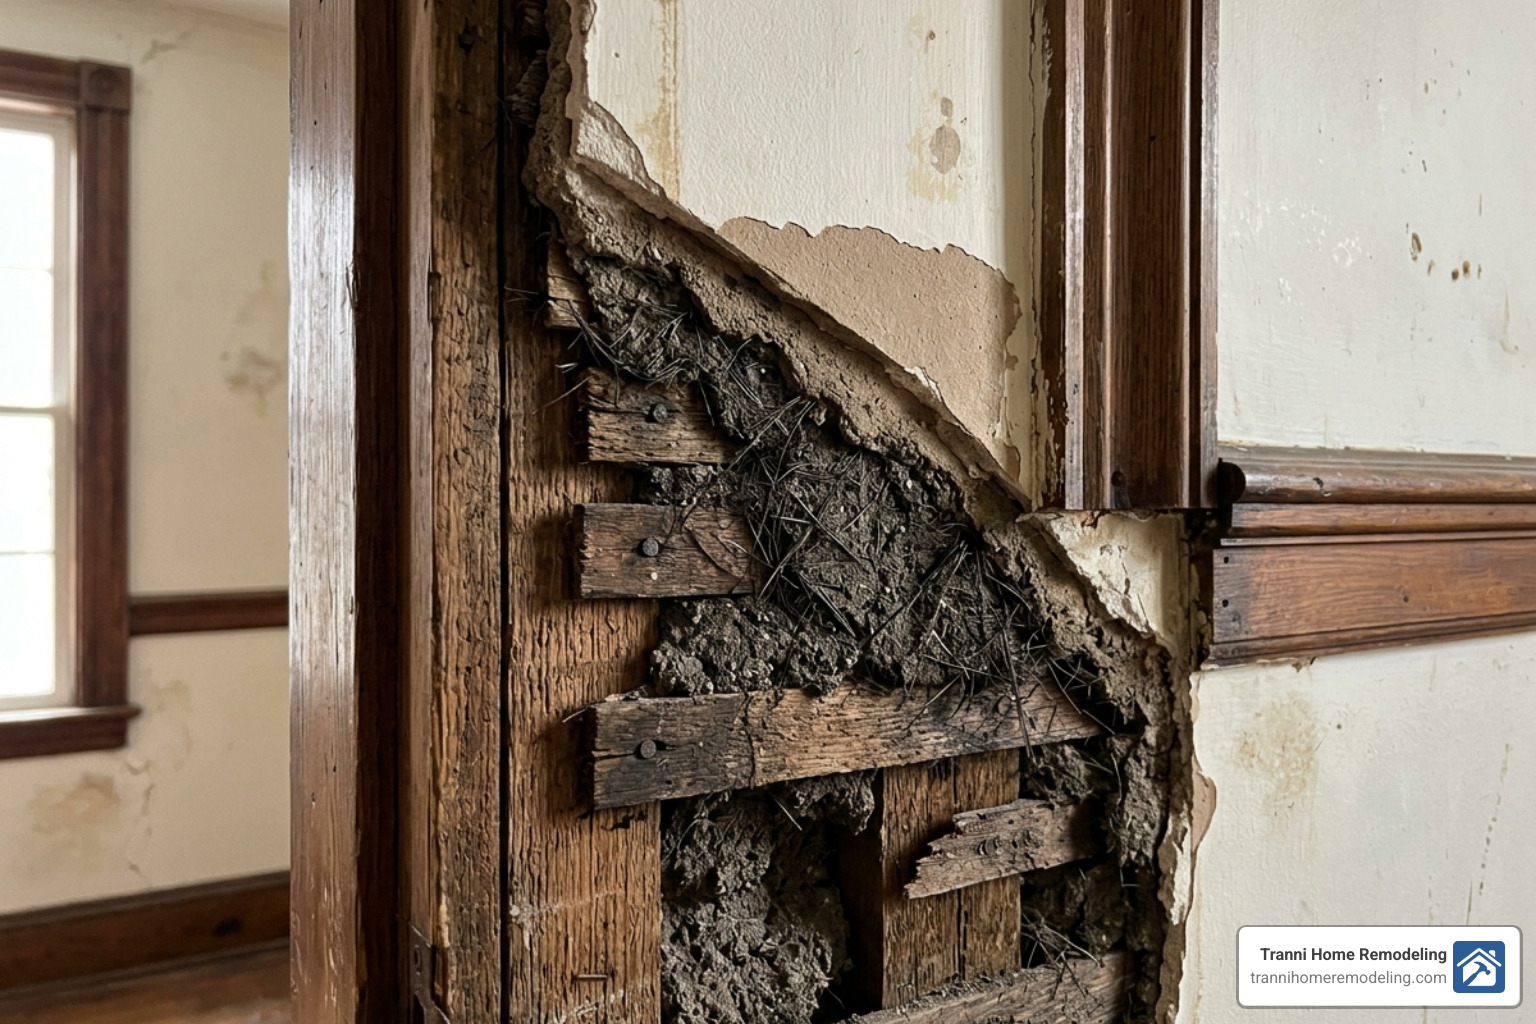
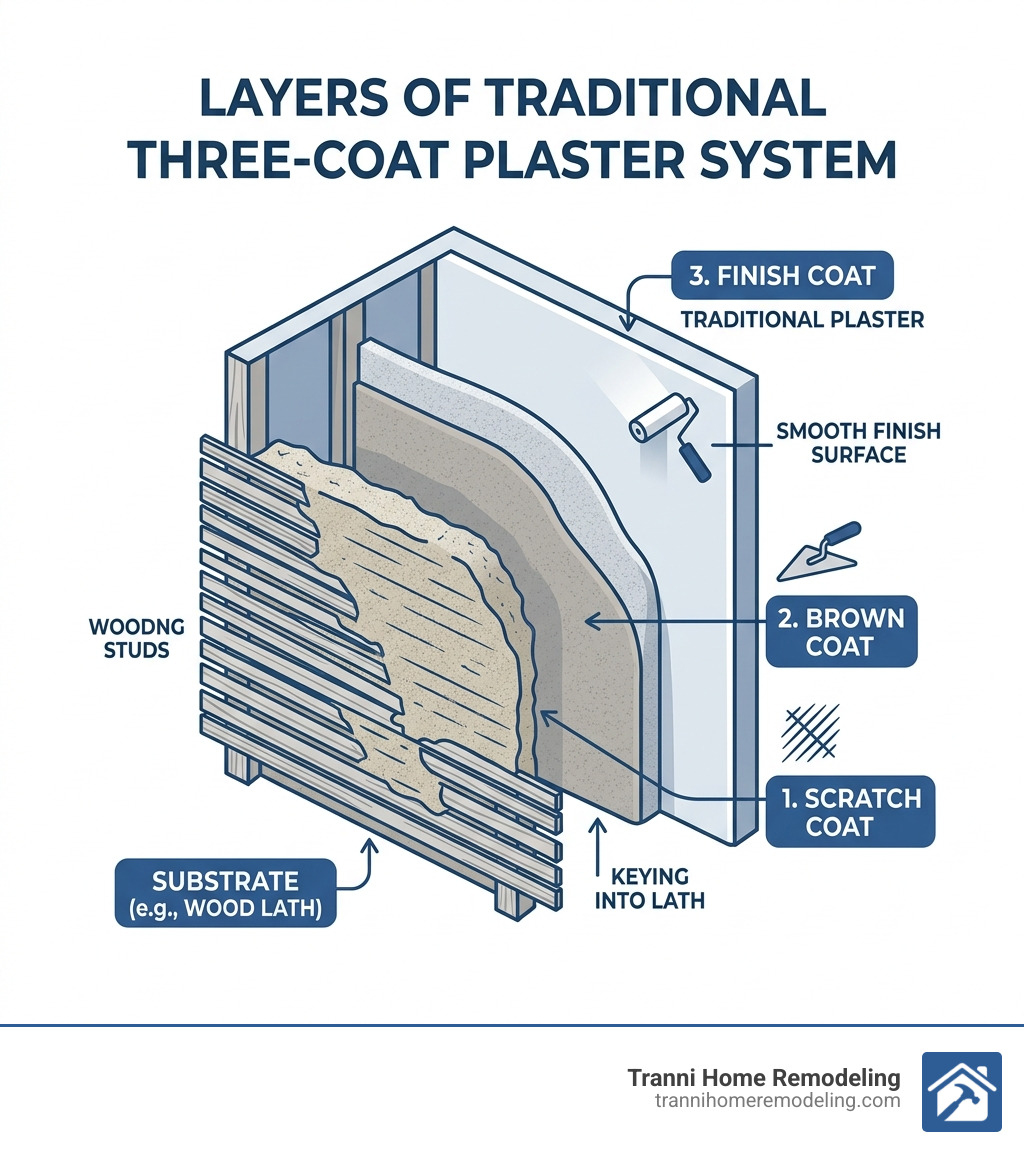
The wood lath consists of thin strips of wood nailed horizontally across the wall studs or ceiling joists, with small gaps between them. When the wet plaster was pressed against the lath, it oozed through these gaps and slumped down on the back side. Once hardened, these “globs” of plaster formed what we call keys. These keys are the only thing holding the heavy plaster wall to the frame of your house.
One of the most important reasons for Fixing Your Interior Plaster Without Losing Your Mind rather than replacing it is the superior quality of the original material. Historic plaster is an integral part of the building’s “historic fabric.” It offers:
- Sound Deadening: Plaster is much denser than drywall, making it highly effective at blocking noise between rooms.
- Fire Resistance: Traditional plaster, especially lime-based, is naturally fire-resistant.
- Custom Contours: Plaster can follow the slight shifts and curves of an old house in a way that rigid drywall simply cannot.
According to Preservation Brief 21: Repairing Historic Flat Plaster, the minimum thickness for plaster on wood lath is typically 3/4 to 7/8 of an inch. This thickness contributes to the “rock-like” feel of historic walls.
Traditional Materials: Lime vs. Gypsum in Historic Plaster Repair
In our local area—stretching from Billerica and Reading to Concord and Lexington—the type of plaster we find depends largely on when the home was built.
- Lime Plaster: Used almost exclusively until the late 19th century. It is made from lime putty, sand, and a fiber binder (often cattle or hog hair). Lime plaster is breathable and can survive occasional moisture, but it takes a very long time to cure—sometimes over a year before it can be painted!
- Gypsum Plaster: Gained popularity around 1900. It sets much faster (in minutes) and dries completely in two to three weeks. While it provides a harder finish, it is much more vulnerable to water damage than lime.
When performing a historic plaster repair, we must ensure the new materials are compatible with the old. Using a hard, modern setting compound over soft, historic lime plaster can cause the repair to pop out as the house shifts. For more technical details, you can explore more info about plastering services.
The Importance of Preservation in April 2026
Preserving your plaster isn’t just about being a “purist.” It’s a smart investment in your home’s value. Historic plaster acts as a cultural record, often hiding original paint colors or stenciling behind layers of wallpaper.
Furthermore, the high lime content in older plaster creates a high-pH environment that naturally resists mold growth—a major advantage in our humid Massachusetts summers. By choosing restoration over demolition, you maintain the artisan craftsmanship that gives your home its soul.
Assessing Damage and Common Causes of Failure
Before we pick up a trowel, we have to play detective. Why is the plaster failing? If you don’t fix the “why,” your beautiful new repair will crack again in six months.
The most common enemies of historic plaster are:
- Water Intrusion: Leaky roofs or plumbing are the #1 killers. Water softens the plaster and rots the wood lath or the nails holding the lath up.
- Structural Movement: Old houses settle. If the foundation shifts or a joist sags, the rigid plaster has to crack to accommodate the movement.
- Vibration: Heavy traffic nearby or even aggressive door slamming can shake the plaster until the brittle keys snap off.
| Damage Type | Description | Typical Cause |
|---|---|---|
| Hairline Cracks | Very thin, map-like cracks on the surface. | Normal settling or seasonal expansion/contraction. |
| Structural Cracks | Wide, deep cracks that go through all layers. | Foundation movement or significant structural stress. |
| Delamination | The finish coat is peeling away from the base coats. | Poor original bond or moisture wicking. |
| Bulging/Sagging | The plaster feels “spongy” or looks like it’s pulling away. | Broken keys; the plaster is no longer attached to the lath. |
Conducting a Plaster Conditions Survey
A professional historic plaster repair starts with a conditions survey. We begin with a visual inspection, looking for brownish water stains (a sign of leaks) or “crow’s foot” cracking.
We then move to physical probing. This involves gently pushing on the plaster. If it moves or feels bouncy, the keys have likely failed. In some high-end restorations, we even use non-invasive tools like infrared thermography to find moisture hidden behind the walls. Archival research can also help us understand if the wall was altered in the past, which might explain why it’s cracking now.
Identifying Delamination and Loose Keys
Delamination is when the top 1/8-inch finish coat separates from the “brown” coat underneath. This often looks like chipping or flaking paint, but it’s actually the plaster itself failing.
Loose keys are more dangerous. When the keys snap, the only thing holding the plaster up is the hope and the friction of the adjacent pieces. On a ceiling, this is a major safety hazard. If you notice a bulge in your ceiling, it’s time to look into plastering repairs wall and ceiling services immediately to prevent a collapse.
The Restoration Process: Stabilization and Patching
Once we’ve identified the problem and fixed the source (like a leaky pipe), we begin the work of saving the wall.
There is a big difference between stabilization and restoration. Stabilization is about stopping the bleeding—making sure no more plaster falls down. Restoration is about making it look like the damage never happened.
Step-by-Step Three-Coat Method
For holes or large cracks, we follow the traditional three-coat method. This ensures the patch has the same strength and thickness as the original wall.
- The Scratch Coat: The first layer is pressed hard into the lath to form new keys. While still wet, we “scratch” the surface with a comb to create a rough texture for the next layer to grab onto.
- The Brown Coat: Applied after the scratch coat has set (usually 48 hours). This layer levels the surface. We use a “slicker” or a long straight edge to ensure the wall is flat. It should sit about 1/8 inch below the final surface level.
- The Finish Coat: The final, thin layer (about 1/8 inch thick). This is often a mix of lime putty and gauging plaster. It is troweled to a smooth, hard finish.
For those interested in the specifics of our local process, our interior plastering services follow these exact preservation standards.
Reattaching Plaster to Wood Lath
If the plaster is in good shape but has just pulled away from the lath (loose keys), we don’t necessarily have to tear it down. We use two main methods for reattachment:
- Plaster Washers: These are small, perforated metal disks. We screw them through the plaster and into the lath or studs, pulling the plaster back tight. We then skim over the washers so they disappear.
- Adhesive Injection: Using specialized conservation methods, we can inject acrylic resins behind the plaster. These adhesives “re-glue” the plaster to the lath, creating a bond that is often stronger than the original keys.
Choosing the right method requires professional plastering services to ensure the weight of the plaster is properly supported.
Professional Restoration and Cost Considerations
Historic plaster repair is a labor-intensive craft. In fact, industry statistics suggest that the cost of plaster repair is roughly 5% materials and 95% labor. This is because it requires a high level of skill, patience, and specialized tools.
Factors Influencing Restoration Pricing
Several factors will impact the final quote for your project:
- Ornamental Complexity: Restoring a flat wall is one thing; replicating a 19th-century crown molding or a ceiling medallion is quite another.
- Access: High ceilings in a foyer may require extensive scaffolding, which adds to the setup time.
- Extent of Damage: A few hairline cracks are a quick fix, but a ceiling with systemic key failure requires stabilization before patching can even begin.
- Historical Accuracy: Using authentic lime putty and horsehair binders takes more time and specialized sourcing than using modern bagged gypsum.
For a general idea of how we price room-sized projects, check out the average cost of plastering a room.
Estimated Costs for Historic Projects
Note: The following figures are average internet data and do not represent actual quotes from Tranni Home Remodeling. Every historic home is unique and requires an on-site assessment.
Based on national averages for specialized historic work, homeowners might see a wide range of pricing:
- Minor Patching: $15 to $40 per square foot.
- Extensive Stabilization & Re-keying: $50 to $100 per square foot.
- Ornamental Restoration: $150+ per square foot.
Because the labor is so specialized, the high end of pricing can easily be 3x or more than the average for standard modern plastering. However, when you consider the cost of demolition, debris removal, and the loss of home value, affordable plastering services focused on restoration are often the more economical choice in the long run.
Frequently Asked Questions about Historic Plaster Repair
When should I repair historic plaster in place versus replacing it?
You should almost always attempt to repair in place if more than 50-60% of the plaster is still soundly attached to the lath. Repairing in place maintains the “reveal” of your wood trim (drywall is often thinner or thicker, making trim look “sunken”). It also preserves the fire and sound ratings of the original wall. Replacement should only be considered if the plaster is crumbling to dust due to extreme, long-term water damage. If you’re planning to paint anyway, our plastering and painting services can handle the entire transition seamlessly.
What tools are necessary for authentic historic repairs?
If you were to peek into our tool bags, you’d see:
- The Hawk: A square metal plate with a handle underneath used to hold the “mud.”
- Trowels: Various sizes for spreading and smoothing.
- The Darby: A long, two-handed tool used to level large areas of the brown coat.
- Margin Trowel: A small, rectangular trowel for getting into tight corners.
- Galvanized Metal Lath: Used to bridge large holes and provide a superior bond for patches.
When to Hire a Professional for Historic Plaster Repair
While a DIYer can certainly handle small hairline cracks with some joint compound and tape, large-scale historic plaster repair is a different beast. A professional brings:
- Structural Knowledge: We can tell the difference between a “house settling” crack and a “my roof is falling” crack.
- Material Matching: We know how to mix lime and gypsum to match the porosity and movement of your existing walls.
- Speed and Cleanliness: Plastering is messy. Professionals have the systems in place to protect your floors and furniture.
When dealing with the heritage of your home, it’s best to consult with experienced drywall and plaster contractors who respect the history of Massachusetts architecture.
Conclusion
Your home’s plaster walls are more than just a surface; they are the literal “skin” of its history. At Tranni Home Remodeling, we believe that high-quality craftsmanship means respecting the work of the artisans who came before us. Whether you are dealing with a sagging ceiling in a Concord Victorian or a cracked wall in a Lexington Colonial, we have the expertise to save your home’s heritage.
We are proud to serve homeowners in the following communities, providing specialized restoration and remodeling services in:
- Billerica, MA (Our home base!)
- Reading & North Reading
- Lexington & Lincoln
- Concord & Carlisle
- Woburn & Winchester
- Andover & North Andover
- Chelmsford & Tewksbury
Don’t let your home’s history crumble away. If you’ve noticed cracks, bulges, or water damage, request a consultation for your historic home in Billerica, MA today. Let us help you ensure your home’s story continues for another hundred years.